Follow the guides provided below to effectively manage WHM Accounts in Reseller Hosting.
The reseller refers to a cPanel account with the capacity to produce other cPanel accounts. Users who sign up for dedicated or VPS hosting plans have access to reseller WHM. Resellers administer cPanel accounts with limited WebHost Manager interface. Resellers have access to WHM. However, they cannot use related features for security reasons.
Let us start with the basics.
WebHost Manager indicates the administrative portion or section of the cPanel software to manage all hosting service aspects. WHM enables the following:
- Creation and management of hosting accounts
- Adding and editing hosting packages and features
- Manage the hosting server through a user-friendly and intuitive interface
Performing Simple WHM Reseller Admin Tasks
It is important to become familiar with access levels the cPanel and WHM servers offer in managing the reseller hosting account. The access levels to the control panel are the following:
- WHM – Administrative or Root
- The cPanel users
- Reseller WHM – Reseller users can maintain cPanel accounts.
- Features indicate plugins, tools, and utilities. Examples are the Domain Name System Editor and AWStats, an open-source reporting tool for web analytics.
- Packages are resources like bandwidth limits and use of disk space allocated to cPanel accounts.
Add WHM after the domain name to access your WebHost Manager. The domain must point to the user’s account with the web host. You may access WHM by typing server name and adding WHM at the end. This is necessary if the domain does not point to your Cloud account. Acceptance of the certificate will redirect you to the page with the login form. Fill in your cPanel username and password.
Modify your Account
Find out the process of making changes or editing an existing WHM hosting account.
- Click the ‘Modify an Account’ link.
- Click the account you want to change.
- Click Modify.
Note:
It is possible to tweak the cPanel theme, number of permitted email accounts, mailing lists, File Transfer Protocol accounts, and MySQL databases. You can also adjust the addon domains, parked domains, and subdomains.
- Make the necessary changes.
- Click Save after implementing modifications.
Changing your Account Password
The next is to learn how to change account passwords in WHM. Changes are needed for security reasons or if the user forgets the password. Users can replace their passwords from cPanel only by using the WHM password modification tool. This applies to forgotten codes or clients unable to log in to cPanel.
- Click ‘Password Modification’ link.
- Choose the account requiring change of password.
Note:
Keep in mind that account passwords must consist of six up to eight characters. It must start with a letter in lower case. For additional protection, use a combination of letters and numbers.
- Click the ‘Change’ tab. You need to type the new password to access your cPanel account and connect to the same account through FTP.
Modifying an Account Quota
You must also learn how to vary the amount of allowable storage space. This refers to the quota for specific hosting accounts.
- Click the link which indicates ‘Account Functions’.
- Click Quota Modification.
Note: This page records all accounts included in the WHM. It also registers the aggregate amount of storage space that each account uses.
- Replace the quota for your hosting account.
- Click the Change icon.
Users now have access to the modified storage space. You can use said feature if clients want an upgrade or encounter issues such as low storage space.
Suspending or Unsuspending Accounts
Suspend WHM Hosting Account
- Click the link that says ‘Account Functions’.
- Click the ‘Manage Account Suspension’ link.
Note:
This refers to the page where users can suspend existing accounts or unsuspend accounts that have been held in the past.
- Choose the domain you wish to suspend.
- Provide the reason or reasons for suspension. This is for the account owner’s file or reference.
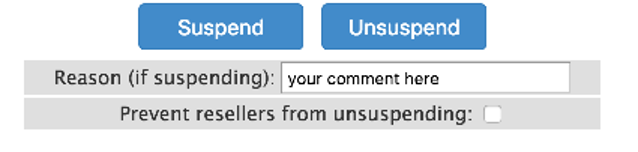
- Click the Suspend icon.
Note:
The account is now suspended. Browsers will see the Suspended Account notification in your website rather than the home page. Likewise, it is possible to customise the Suspended Account page.
- Click the link which states ‘List Suspended Accounts’.
Note:
You can list all accounts suspended in WebHost Manager on this page. You can view all suspended accounts as well as the corresponding reasons. Termination of accounts also take place in this page.
Unsuspend WHM Hosting Account
Find the domain you wish to unsuspend. Click the Unsuspend button.
Consequences:
Suspension means the system stops all processes or functions associated with that account. Other effects include:
- It logs users out of the current session.
- The system stops users’ Cron jobs or scheduled tasks.
- Mailing lists will no longer function.
- Web disk (WebDAV) will stop functioning. This refers to the drag and drop cPanel interface that allows the user’s access to website files.
- Accounts’ email users cannot download email messages.
Managing Reseller Accounts
If you prefer to manage any reseller account, use any of the following WebHost Manager interfaces:
- The Reseller Section (WHM >> Home >> Resellers) provides access to all reseller features.
- The Reseller Center interface (WHM >> Home >> Resellers >> Reseller Center) allows you to add or remove reseller privileges. It also provides links to all reseller features.
Current Privileges for Reseller Accounts
The system provides limited privileges (by default) to multiple reseller accounts. In adding privileges to reseller accounts, use the following interface: “Edit Reseller Nameservers and Privileges”.
(WHM >> Home >> Resellers >> Edit Reseller Nameservers and Privileges)
These are the following categories where resellers can access their privileges.
Category Description
Standard The list contains essential reseller functions. Resellers can add and take away any account.
Privilege The list contains the reseller’s capacity to create and change individual web hosting packages.
Global The list covers privileges for server administrators. Examples include the Restart System Services and Access to View.
Super Privileges are not recommended for resellers.
The list consists of options like account and quota modification. These are the alternatives allowing resellers to create accounts minus the packages and avoid resource limits.
- Modification of Accounts
- Modification of Bandwidth Limits
- Modification of Quotas
Root Access
Refrain from enabling the All Features Option under the Root Access for resellers. This selection supersedes the creation limits of resellers’ accounts.
Consider this example: Resellers are limited to two accounts. In this case, enable All Features you can find under Root Access. The WHM will permit resellers to create the maximum number of accounts and not only two for as long as they want. Said option also allows resellers to see their accounts including unwanted ones on the server. The All Seller platform lets resellers access the fully-functional interface of WHM.
Create more user accounts in WebHost Manager that do not correspond to the cPanel account. For business owners or managers, it is an effective way of allowing employees to perform the following:
- Study or check bandwidth reports
- Resetting of passwords
- Configuration of mail boxes
- Suspend as well as unsuspend accounts
- Manage Domain Name System entries
Create WebHost Manager Without Associated Domain
These are the following steps to facilitate creation of a WebHost Manager account without an associated domain:
- Log in to your account as the Root User on the server through the Secure Socket Shell or SSH.
- Use this command in creating a new user: Adduser – username
- Use this command in setting a password for the new user: passwd – username
The /var/cpanel/resellers file distinguishes users who are resellers as well as permissions these reseller users hold. To create an entry in the resellers file granting user full permissions and register the user in the WHM interface, run the following command:
echo "username:all" >> /var/cpanel/resellers
Note:
The user’s username: all entry provides root-level permissions to users. If you enable root – level access to a reseller, he or she gets the same privileges as the web server’s administrator.
Here are the steps:
- Create the user file in this directory: /var/cpanel/users.
To accomplish this, run the following command: cp/var/cpanel/users/system/var/cpanel/users/username
- Open the /var/cpanel/users/username file using the text editor. Remove this line: DNS =
- Log in as Root User to the WHM.
- Proceed to the interface of WHM Edit Reseller Nameservers and Privileges.
- Pick out username from the menu.
- Click Submit.
- Choose the check boxes that correspond to the preferred user permission. Click Save.
Final Reminder
It is vital to understand carefully the process of administering WebHost Manager accounts in Reseller Hosting. This approach helps you avoid any short and long-term issues that can adversely affect your operations.