If you are thinking of establishing a reseller hosting business, it will be helpful to know how you can get started with reseller hosting – beginning with the features you should look for in a hosting provider, as well as the step-by-step process when purchasing a reseller plan.
Whether you are looking for a reseller hosting plan because you own and operate multiple websites or want to start offering web hosting packages to your clients, it is important to gather all the information you need so you can determine which web hosting company offers the most benefits and works best for you, allowing you to make the most of your reseller hosting business.
When choosing the best reseller hosting company, look for one that will provide you with these features:
- Complete manageability and flexibility
- Ability to brand your own web hosting company
- Value-added features, such as billing software, domain hosting, email hosting, additional scripts and monitoring tools
- Sufficient disk space and bandwidth
- Stellar customer and technical support
- Reasonable rates
- Money-back guarantee
Choosing a Reseller Hosting Provider and Package
The success of your online venture depends on the reliability of your chosen parent web hosting company since the effectiveness of the service they provide will reflect on you. There are now a plethora of web hosting companies offering reseller hosting packages and the challenge lies in selecting the right one for your needs.
One way to do this is to read reviews of hosting providers. There are various review sites that offer comprehensive studies for dozens of web hosts, and they provide all the details you will need to make an informed decision.
Once you’ve chosen a provider, the next step is to pick out a package for your web hosting business. Reseller hosting plans usually come in tiers, with each tier offering more value for your money, such as storage space, bandwidth, account transfers, and number of accounts you can create, among others.
Generally, it’s recommended that you start with one of the most simple and economical packages offered. Doing so will allow you to boost your clientele without having to put up too much money right from the outset.
The Purchasing Process
For this article, we’ve chosen Jolt’s Reseller Hosting Plans as an example for how to purchase a reseller hosting package.
Step 1: Select and purchase a domain name from the top domain registrars, such as NameCheap.com, GoDaddy, and Network Solutions, to name a few. Alternately, you can choose to purchase your domain name through your preferred reseller hosting provider.
Tip: Remember that the domain name you choose must be relevant to your business or purpose, easy to remember, and easy to type. Using keywords that describe your business and the services you offer is also a good idea. Also, make sure to use an appropriate domain name extension.
Step 2: Compare hosting providers and choose the one that offers the right plans that meet your requirements. For this example, we are using Jolt Reseller Hosting, one of the best reseller hosting providers in the industry.
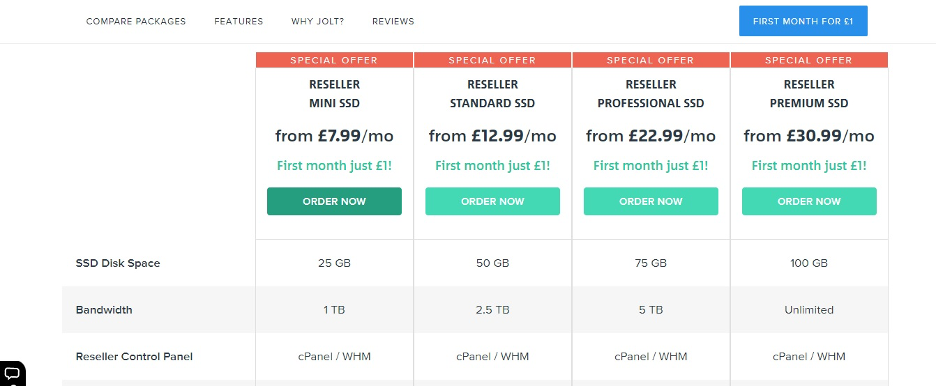
Step 3: Analyse the different reseller hosting packages offered by your chosen provider. As mentioned above, these packages come in tiers, with each tier offering more features and benefits. Like most other web hosting providers, Jolt offers multiple reseller hosting packages: Reseller Mini SSD, Reseller Standard SSD, Reseller Professional SSD, and Reseller Premium SSD. These plans are designed to scale as your business grows, which means you can upgrade your reseller hosting package any time.
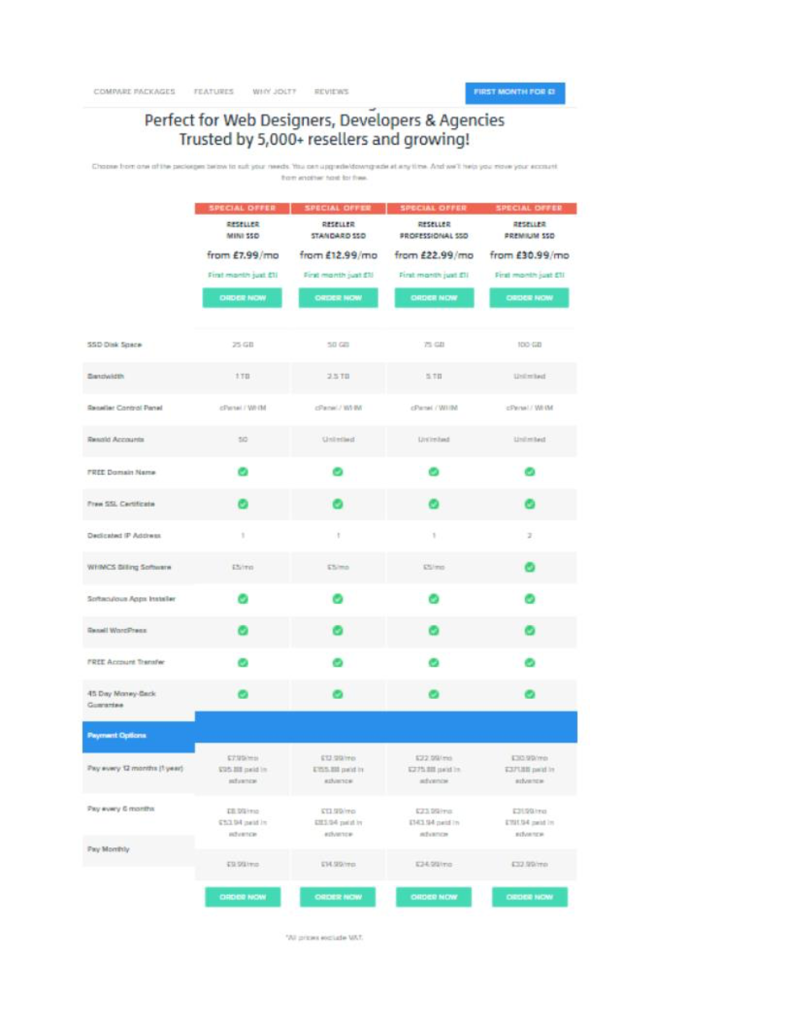
As you can see, aside from a 45-day money-back guarantee, Jolt offers their reseller packages for only £1 for the first month – this is currently one of the best reseller hosting deals as it will allow you to try out your reseller hosting business for one month without investing too much capital right from the beginning.
Carefully consider which plan will suit your needs best. Generally, if you are just starting out, the first and most basic tier will likely be sufficient to meet your requirements. However, if you are certain that you need more than the basic plan allows, such as more disk space and bandwidth and unlimited cPanel accounts, you can certainly choose from the other available plans.
Step 4: Select and purchase a reseller hosting plan. Click ‘Order Now’.
For this example, we’ve chosen the Reseller Mini SSD package.
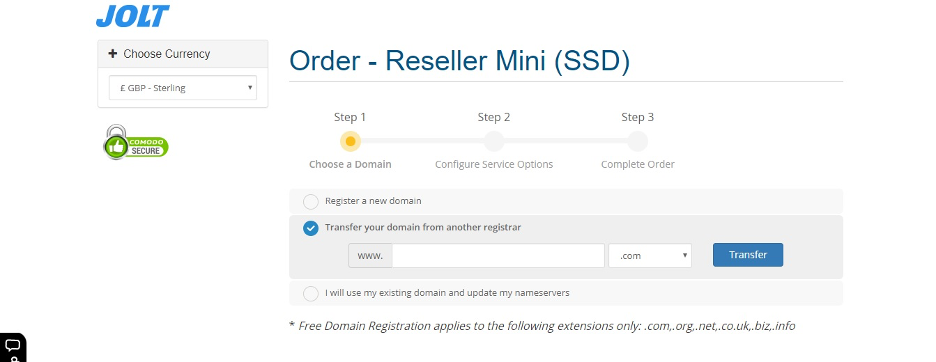
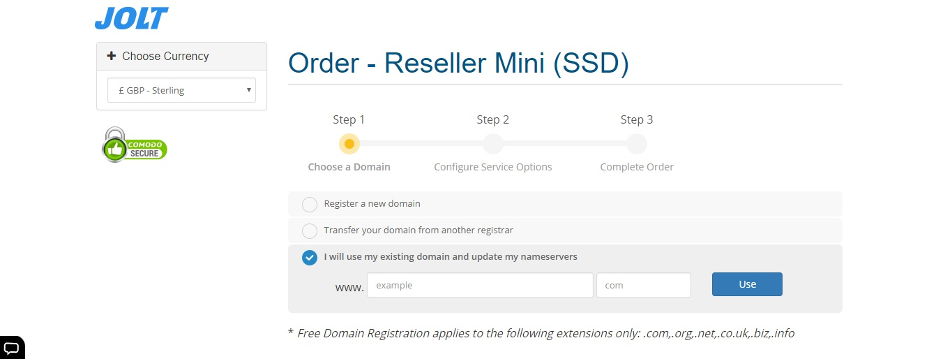
Step 5: You will be taken to the shopping cart. You have three options; choose the one which is appropriate to your situation:
- Option 1: Select ‘Register a new domain’ if you haven’t yet purchased and registered a domain.
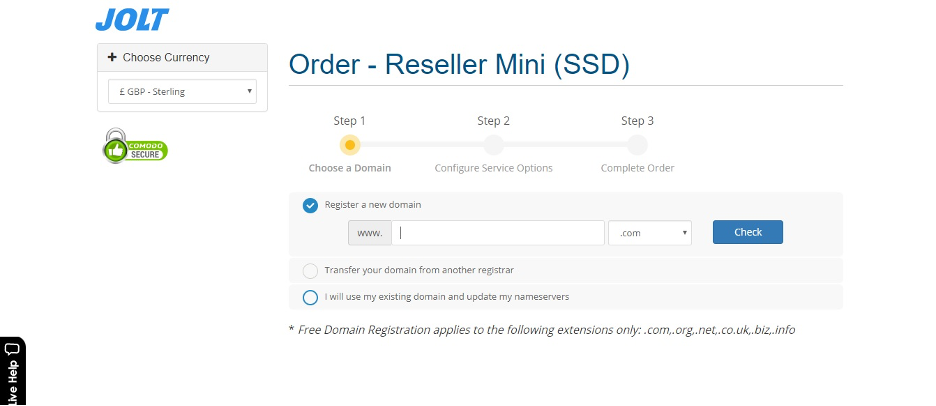
- Option 2: Select ‘Transfer a domain from another registrar’ if you’ve already purchased and registered a domain prior to purchasing your reseller hosting plan.
- Option 3: Select ‘I will use my existing domain and update my nameservers’ if you wish to transfer your reseller hosting account to Jolt.
Step 6: You will be asked configure your desired options before proceeding to checkout.
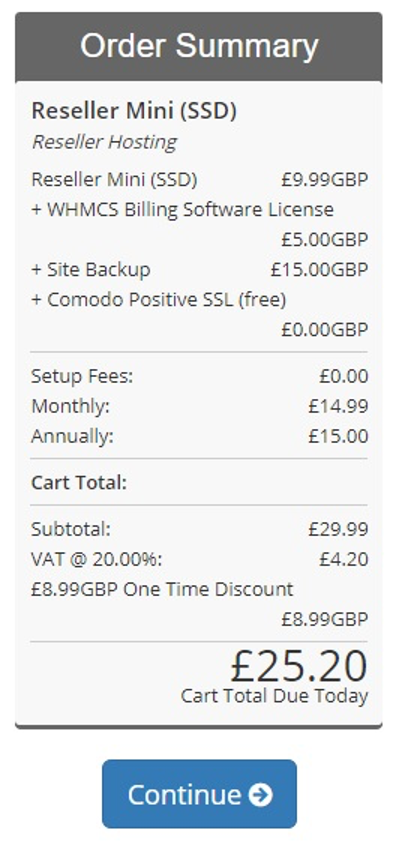
If you choose the basic package, you will need to purchase additional features that you would need or want, such as the WHMCS Billing Software, SSL certificates, and Site Backups, among others. Click ‘Add to Cart’ for the features you wish to purchase. The cost for these will be reflected on the Order Summary where you will see how much you will be charged.
Step 7: Once you are done configuring your service options, click ‘Continue’ on the Order Summary to complete your order.
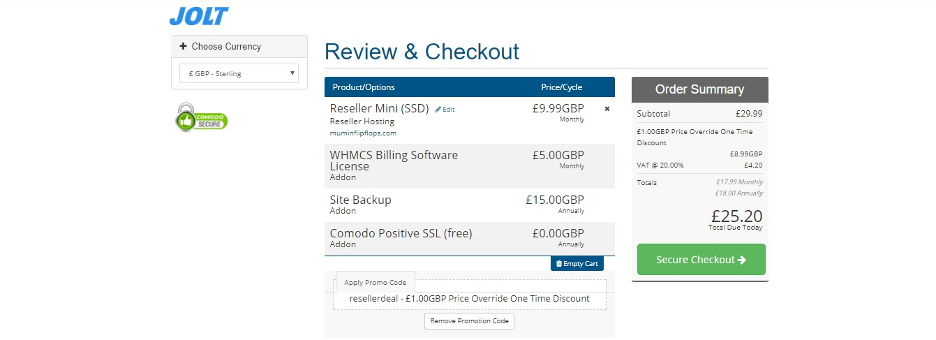
Step 8: Next, you will be taken to the “Review & Checkout” page. You can choose to remove any product or options if you want, or proceed to checkout by clicking on the green ‘Secure Checkout’ button.
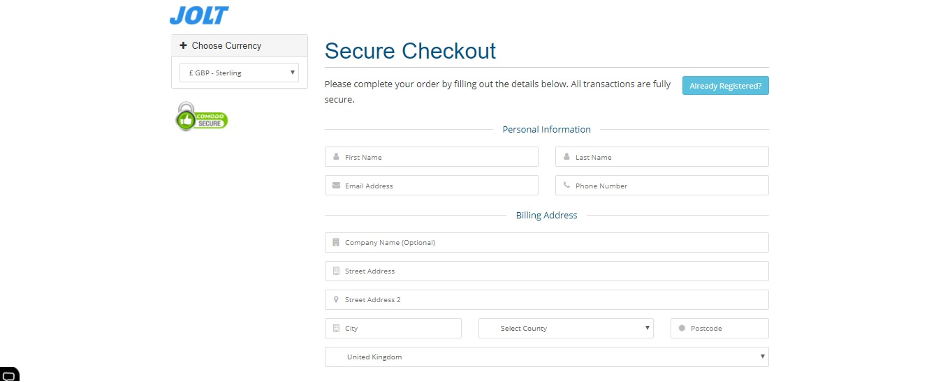
Step 9: Fill up the “Secure Checkout” page. You will need to provide personal information, such as your name, email address, telephone number, as well as a billing address.
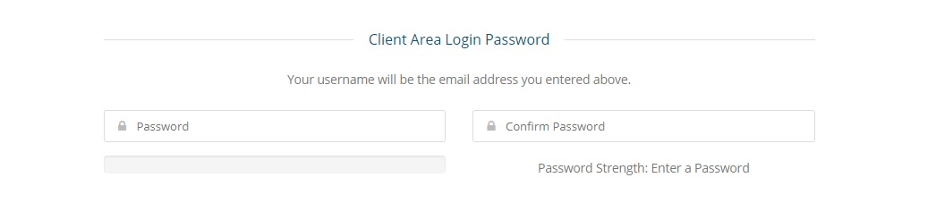
You will also need to fill up the “Client Area Login Password” section. The password you provide will be the password you will use to login to your Jolt reseller hosting account. Make sure to choose a strong, secure password to avoid account theft.
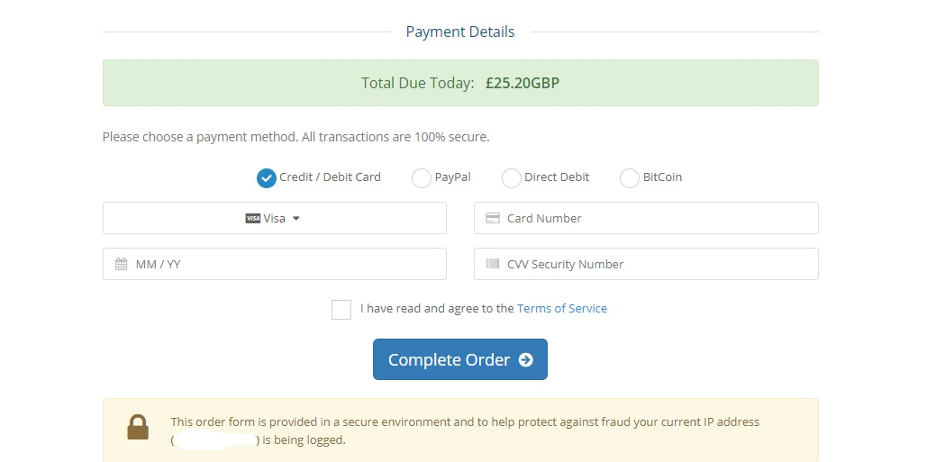
The “Secure Checkout” page also includes accepted payment methods. Jolt offers three payment options: Credit/Debit Card, PayPal, Direct Debit, or BitCoin.
Select the payment method you would like to use. Tick the ‘I have read and agree to the Terms of Service’ box after reading the TOS. Then, click the blue ‘Complete Order’ button.
Step 10: After successfully paying for your reseller account, you can expect a few email messages from Jolt.
- The first email will be entitled ‘Jolt.co.uk Invoice Paid’. This serves as an official receipt for your purchase of the reseller hosting package.
- The second email will be entitled ‘Welcome to Jolt.co.uk’. This email will confirm that your new account has been setup and provide the details you will need to be able to login to the client area, such as the email address and the password you provided upon sign up.
- The third email will be entitled ‘Jolt.co.uk Reseller Account Details’. Make sure to read this email in full and print it. This message contains all the necessary details you will need in order to login to your cPanel and Web Host Manager, such as the username and password. You will also find the links to your cPanel and Web Host Manager in this email. It also contains other useful information such as how to create a new account in Web Host Manager. Equally important, this email will contain the nameservers to which your domain should be pointed. Other helpful links are included in this email such as the Jolt Wiki, blog, support, and server status pages.
Step 11: You can now login to your Jolt Dashboard. This is what it will look like:
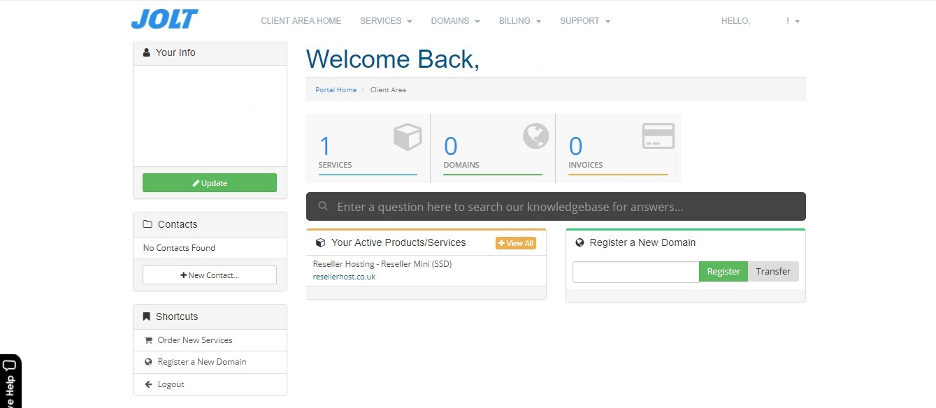
Clicking on ‘Services’ will take you to the “My Products and Services” page where you can view your current products and services, place a new order or view available add-ons.
Clicking on ‘Domains’ will take you to the “My Domains” page where you can view your active or expired domains. You can also register or transfer a domain via this page.
Clicking on ‘Invoices’ will take you to the “My Invoices” page where you can view all your Jolt.co.uk invoices and the status of the invoices. At the top left side of the page, you will be able to quickly see if you have any unpaid invoices. You can also view quotes generated for you by Jolt.co.uk, configure mass payment for invoices, manage credit card, and deposit money in advance.
Important Note:
Note that the Jolt.co.uk dashboard is where you will be able to manage your Jolt Reseller Account, pay your monthly bill with Jolt, submit helpdesk tickets, edit your personal information, manage your domains, or order new services from Jolt.
On the other hand, the Web Host Manager dashboard is where you can create, modify or delete reseller accounts, add packages to offer to your clients, and configure the server linked to your Jolt Reseller Account. Meanwhile, the cPanel dashboard allows you to manage File Manager, FTP Accounts, backup wizard, email accounts, and databases, to name a few.