Categories
Articles

Managing Your Domains’ DNS Zones on WHM

Learn how you can administer the DNS zones of your domains on WebHost Manager.

Users must understand that the Domain Name System (DNS) is crucial to understanding how the Internet, as well as websites, function. DNS refers to that database that links host names like www.exampledomain.com to specific Internet Protocol (IP) addresses such as 192.168.124.1. However, there are different features to consider aside from linking host names to various IP addresses.

The Domain Name System functions like a contact list for the worldwide web. DNS allows Internet users to generate and categorise online information without much difficulty. The Internet depends on the DNS for straightforward navigation. Users are not obliged to memorise a long list of web hosts’ number-based addresses. They only remember names of websites.

The DNS looks unusable initially. It even overawes ordinary users. To remove this notion, we must understand its importance by knowing that applications as well as processes rely on the Domain Name System’s service. These include WWW or World Wide Web and email messaging.

All about DNS Zones

Domain Name Systems are segregated into zones. The zone keeps name information related to the domains. These become sources of data for each name within the zone. DNS zones act as database for storing single domain names. These names become part of the same or another zone if classified under the domain that produced the zone. One of the name server’s purpose is to locate servers and exact zones. At the same time, it collects the following details:

  • A record which is responsible for directing the domain or subdomain to a specific IP address.
  • CName record redirects the domain or subdomain to another domain like www.exampledomain.com.
  • MX Record ensures email recipients get their mail where they want them.
  • NS Record must match the used nameservers.

More technically knowledgeable users have the prerogative of managing DNS zones using the WebHost Manager as well as functions available on the cPanel. Follow these basic steps if you find it necessary to change NS records:

  • Log into WebHost Manager.
  • Expand the Domain Name System functions.
  • Click the icon that says Edit DNS Zone.
  • Choose the Domain Name. Click Edit.
  • Change the nameserver with your main private nameserver.
  • Replace each nameserver with your private nameserver.
  • Click Save at the bottom of the page.

You may use WHM and cPanel to indicate MX records to remote or local servers in the WebHost Manager.

  • Log into WebHost Manager.
  • Expand the Domain Name System functions.
  • Click the Edit MX Entry tab.
  • Choose the domain name you want to replace. Click Edit.
  • Choose from Local, Backup or Remote Mail Exchangers.
  • Click Automatically Detect Configuration if you are unsure. Click Change.
  • Indicate where the MX Records will be pointed. Click Save.

 For cPanel

  • Log into your cPanel account.
  • Click MX Entry under Mail.
  • Choose from Local or Remote Mail Exchangers.
  • Click Change.

Column  Headings

Identify and understand the following column headings:

  • Domain refers to the domain name connected to the entry.
  • Time to Live (TTL) is the duration the user must cache the DNS Entry.
  • Record type is the DNS record category.
  • SOA means the beginning of authority record. It contains information recorded with a certified Domain Name Registrar regarding the domain. This includes the hot name of the authoritative nameserver, server administrator’s contact email address with a period rather than the sign (@), and time data/settings that dictate how users must store the DNS data.
  • Serial Number consists of the date, time, month, and year when the record was previously edited.
  • Refresh refers to the interval that must pass before users refresh the zone information.
  • Retry refers to the interval that must pass before users retry following a failed attempt.
  • Expire refers to the interval after which records are no longer reliable.
  • Minimum TTL is the duration for caching of DNS information from the zone.
  • NS is the Nameserver record specifying the host name users refer to when they search for the domain.
  • Address Record matches the domain name with the IP Address.
  • MX is the Mail Exchange Record. It matches the domain name with the list of servers handling emails for your domain and tags each one with a priority. The highest is zero.
  • CName means Canonical Record. It matches the domain name with a pseudonym. It is helpful if you run a server aside from Apache such as FTP servers on a separate port.

You may include new entries to the Domain Name System record through the empty fields at the bottom portion of your screen.

Editing the DNS Zone

In editing or viewing zone information, pick the preferred domain from Choose a Zone to Edit menu. Then, click Edit to make the new interface appear.

Zone/Server Information

At the top section of Edit DNS Zone, you will see the zone/server information:

  • cPanel first refers to the WHM and cPanel versions along with the build number. It is where you created the Domain Name System zone.
  • Update time is the UNIX date and time during the most recent revision of the zone file.
  • The cPanel: Zone File version creates uses for the WHM and cPanel.
  • Server Host Name
  • DNS Zone Domain
  • TTL default time in seconds which indicates the length of users’ cache zone data (DNS).

Edit the Zone

This interface shows the table of domain’s DNS entries in the following columns:

  • Domain Name
  • ENS Entry Time to Live (TTL)
  • DNS record Type

To add entries, use the empty text boxes beneath “Add New Entries Below this Line” heading if you want to have additional entries to the Domain Name System zone. It is necessary to configure or organize your DNS records properly. Otherwise, visitors cannot access these domains. Click Save after entering the required information.

Set an exclusive IP address for your domain as well as mail server. The mail server’s Internet Protocol IPv4 address changes automatically in case you modify the IP address of the domain’s A record. This happens since the basic zone template uses the CName record in pointing the mail server to the A record.

Perform these steps to designate a separate IPv4 address to your mail server:

  • Replace the MX record value to mail.domain where the “domain” stands for the domain. Here is an example. Change example.com to mail.example.com. Do not forget to include the period after mail.example.com.
  • Choose CName from the Record Type menu.
  • Click Save. Use the WebHost Manager Edit Zone Template interface to tweak the zone template. This allows new domains to create MX records that assign a different IP address to your mail server. WHM>>Home>>DNS Functions>>Edit Zone Templates.
  • Configure the Email routing.

Here are several words of caution:

Any email routing settings that were not configured correctly disrupts receiving of email messages. If you are not sure of the options, call your system administrator or the hosting company. The interface displays only information for email routing for domains the server is hosting. One example is the DNS clustering configuration.

Choose one of the following under Configure Email Routing Automatically Detect Configuration. It utilises the following benchmarks to align the email routing settings:

Local Mail Exchanger refers to the lowest-numbered mail exchanger pointing to an IP address on this server.

Backup Mail Exchanger refers to the lowest-numbered mail exchanger pointing to an IP address not located on the server.

Remote Mail Exchanger means no mail exchangers are pointing to an IP address on this server.

In case the organized MX records do not resolve issues, the automatic detection feature will not happen.

For Local Mail Exchanger, the server continuously accepts emails for this domain. The system delivers the mail to your local mailbox.

Select this option if your server makes use of smart hosts or some other gateway service to filter messages. 

For Backup Mail Exchanger, the server acts as backup mail exchanger. The system will store mail for this domain until a lower-numbered mail exchanger is available. Configure the primary MX record so it points to the appropriate exchanger. 

For Remote Mail Exchanger, the server will not accept mail for said domain. The system sends all mail for this domain to the lowest-numbered mail exchanger. Configure the primary MX record to indicate the appropriate exchanger. At this point, you can already click Change.

Managing the Domain Name System becomes necessary to keep information at the correct address. Organise your website. It will be easier to locate and navigate. Likewise, it improves the site’s efficiency and performance. DNS zone management is overlooked most of the time when it comes to website management.  You are one step ahead if you know the functions well.

Categories
Articles

Guide to Reseller Accounts

It’s essential to understand the basic ins and outs of reseller hosting before deciding to jump into it.

Reseller hosting refers to an enterprise using and selling resources belonging to the parent hosting provider. Majority of web hosts in the United Kingdom create reseller packages. In the case of reseller accounts, owners can utilise their bandwidth and hard drives in hosting websites that support third parties. A reseller purchases hosting wholesale and offers the service for profit without the capacity for technical support.

One major benefit of reseller hosting is balanced earnings. Startups opt for this approach due to limited upfront costs as well as low-risk investments. Service providers who usually offer reseller accounts are web designers, copywriters, database programmers, and Internet marketers. Avoid the fundamental mistakes by learning the basics of reseller hosting before you launch this kind of business.

Here are some essential tips:

  • Purchase the service only from an experienced and trustworthy hosting firm. This company will allow rebranding and reselling portions of allocated disk space as well as bandwidth.
  • Use a user-friendly control panel that facilitates efficient server management and enables segregation into smaller accounts for clients.
  • Concentrate on growing the business and making a profit.

It is not a simple process. Nobody can guarantee a 100% success in this business. You must consider several factors such as your selection of a reseller hosting company.

Reseller Web Host Manager

The Web Host Manager (WHM) refers to a dominant program that facilitates admin access to cPanel’s back-end. Reseller accounts get the basic Web Host Manager and are not capable of accessing Root WHM.

As resellers you obtain the following:

  • Tools for creating, deleting, and suspending cPanel accounts
  • Tools for managing and monitoring websites along with password resetting
  • Access to Domain Name System (DNS) zones
  • Capacity to configure requests for customer support through cPanel
  • Permission to verify hosting as well as control panel
  • Change usernames and client domain names

Resellers do not enjoy these functions:

  • Modify the primary username
  • Permission to restart services like http, SSH, SQL, and email
  • Designate IP addresses
  • Obtain automated backup tools
  • Reseller centre to manage resellers

Startup Guide

  • Determine your requirements. It is not difficult to get going with your hosting account.
  • Change your nameserver (DNS) to get your site functioning efficiently. Complete the step if you are installing a new website.
  • Create the packages. Preset your primary domain name possibly without space and bandwidth. Upgrade your website to one of the new hosting packages. The upgrading process entails logging in to WHM.
  • After creating a package, upgrade your account and choose the suitable plan.

Remember not to delete your main site with the hosting firm. Otherwise, your reseller account will stop working. Allocate at least 1 GB (1024 MB) of disk space/bandwidth. Clients with big or multiple websites generally prefer more space and bandwidth.

  • Create a new account in the WHM Account Functions tab. Complete the required fields such as domain name for the cPanel. Do not include the www before the domain. If necessary, create a cPanel account for your subdomain.

WHM automatically suggests a username after you click the field. If you wish to have another name, remember it must consist of no less than eight characters (letters and numbers without spaces). Do not use special characters. You are not allowed to adopt the username of Root because the server takes it by design.

Choose a secure and exclusive password for your cPanel account. It must not contain the username or the same as the WHM password whether default or temporary. It becomes a security risk. If possible, employ a password generator for protection.

The WHM utilises the email address entered in the field for instant notification of any problems with the account. Enter your email address in place of the account holder’s email if you choose to receive said emails.

The Package drop-down menu contains a predetermined or fixed list of settings as well as limits. You may apply these features to your accounts. Packages that use reseller accounts are attached to the reseller’s username with an underscore. The approach prevents conflicts between user packages on that server.

Choose the DNS at the Domain Registrar. It allows you to indicate if the domain must use private or locally configured nameservers. Check the option if the Registrar configured private nameservers. The WHM sets the DNS for them in this zone correctly. If not, do not check the box to use default nameservers in the configuration.

  • At this point, start uploading your website through the cPanel file manager or File Transfer Protocol (FTP) Client. Include your website’s IP address beneath the FTP address field. You will receive a username and password in your welcome email. Use these accordingly. Proceed to the Public_HTML folder after your FTP has been connected.

Start from Scratch

If you do not own a website, change your Domain Name System.  If you must move to a new host, that provider can help. You begin by filling in an online form. Majority of hosts transfer files for a maximum of 30 domains (free of charge) within 30 days after signing up. Change the DNS following completion of the transfer process. Take note of all useful links for accessing WHM, cPanel, and other websites that you and your customers can utilise once their WHM accounts are activated.

Technical Support

Your host usually provides support through chat, ticket, or phone.

  • Chat is an ideal method if you need answers right away for basic queries and issues. Technicians can help in immediate troubleshooting and guide you in understanding fundamental concerns.

Emails

Control Panel

File Transfer Protocol

You may also seek assistance for sales and billing matters as well as company policies, terms, and conditions.

  • Through ticket support, the live support team can endorse your problem to a ticket if it needs more time and attention than average enquiries. You receive an email after the ticket is created. It confirms that your concern has been logged in to the 24/7 support queue. Administrators will act right away to resolve your issues.
  • Phone support is available round the clock. Representatives can deal with simple questions, complaints, and predicaments. More intricate problems call for the submission of support tickets.

Expect the service provider to bill you automatically for the hosting service on the due date indicated.  This comes after completion of the purchase. Settle your bills monthly to avoid service interruption. Reliable hosting companies provide the required information in their websites.

Hosting Platforms

Online entrepreneurs, who want to engage in hosting for extra income, have options like cPanel and Plesk that make this task easier. Linux supports cPanel. You can procure Plesk from Windows and Linux servers. Compared to basic packages, reseller plans allow vendors to market a variety of products and obtain information of customers. These details include contact numbers, account status, and billing procedures.

Packages are usually cheaper to attract clients. Resellers hype services independently while hosting providers ensure full-service branding. This approach helps users view their services in different web pages. Most parent firms supply resellers with tools for creating a web-hosting venture in addition to the fundamental business model.

Unlike standard plans, reselling produces more alternatives to earn revenues since users generate income from data management as well as servers for merchants who do not have enough time. The practice adheres to the broker concept where resellers get commissions if new customers purchase packages from the company. However, the price of resellers is higher than the cost web hosts offer.

Technical Requirements

Understand the areas that impact a hosting business.

Web hosting functions by storing files in modern servers connected to fast networks. Users input their web addresses enabling the Internet to link up with the host server. The latter keeps files and transmit information to the computer. Hosting includes software, support, bandwidth, and speed. Your choices are the following:

  • Reseller
  • Dedicated
  • Virtual Private Seller

Disadvantages of Reseller Hosting

Reseller hosting’s downsides are security and mediocre performance because of sharing one server among multiple users. A malfunction in the upstream provider can lead to loss of clients. Plans become more expensive because of the middleman business model. As a reseller, you cope with all requests and complaints. Experts propose the following solutions:

  • Managed Hosting Plans– It means you maintain technical staff to perform server, monitoring, maintenance, and security updates as well as respond to issues 24 hours daily for the entire week.
  • Backup – Data requires 24/7 support which rarely occurs. Constant backup is crucial in case of glitches.
  • Protection for DDoS – Guard against Distributed Denial of Service which affects servers, websites, network sources, and data integrity. A rush of incoming messages, irregular packets, and connection requests force your system to crash or become slower.

Now that you have gone through the guide for reseller accounts, the next step is to decide whether you want to make extra income as reseller.

Categories
Articles

Creating a cPanel Account Within WHM

Learn how to create a cPanel account from within Web Host Manager through this useful guide.

Web Host Manager (WHM) and cPanel make websites easily accessible to potential visitors. If your server with its services are ready to function, your next step is to learn how to administer the cPanel account. A unique feature within WHM is its capacity to produce individual cPanel accounts.

Initial Steps (Domain Information)

Log into Web Host Manager. Your first option is to click Account Functions and create a New Account. Otherwise, look for Create a New Account at WHM’s top navigation bar. You can see this at the left-hand corner of the interface.

WHM must determine the primary website’s domain name on the cPanel account. That domain serves as reference for said account. Usernames generally consist of the domain’s first eight letters and cannot be longer than eight characters.

Your cPanel accounts require a robust or strong password. You will receive a notification to retype the password to ensure you entered it correctly. In creating secure passwords, you have the choice of using the Password Generator tool incorporated in the control panel’s interface. You need an email address because WHM sends essential information regarding your account to this email address.

Account Package

Your second step is to choose an account package. The cPanel packages refer to bundled configuration settings that you can utilise in changing settings of multiple accounts. WHM allows users to create packages like an intermediate plan some UK web hosting firms offer. You have the choice of setting plan limits such as addon domains, bandwidth, and space. Choose the Select Manually tab and determine your package limits.

Settings

Identify the cPanel theme you prefer to allot the user with appropriate language. In case you intend to grant Reseller privileges to the account holder, choose the button, make the Account a Reseller. Selecting the option that says Make the Account Own Itself allows users to manage the account. Move to the next tab following completion of the Reseller Setting.

DNS & Mail Routing

You may configure the DNS on your server. Choose the option Use the Nameservers at the Domain Registrar if the DNS for the domain name are found on another server. Use the Auto Detect option if you do not know the functions of email routing settings.

Resource Options

  • For packages that have not been configured, click Select Options Manually. You can choose one from manual options for this account and save as a package.
  • Your first option is to change the Disk Space Quota (MB). You prevent space problems in the server by regulating the amount of disk space cPanel users occupy. The second option applies to bandwidth concerns.
  • The other eight options use integers instead of megabytes as values. Options #3 and #4 limit the number of File Transfer Protocols or FTPs as well as email accounts. Option #5 controls mailing lists. Option #6 limits the MySQL databases.
  • Options #7, #8, and #9 restrict the subdomains, parked domains, and addon domains.
  • Option #10 regulates the number of emails that domains send every hour. It is important to control your customers’ emails.
  • Option #11 uses percentage as value. It controls the sending of failed or deferred email messages per hour. This can turn out useful in preventing the sending of spam mails.

More on Different Settings

The Dedicated Internet Protocol (IP) Address determines if the account is hosted on the server’s main shared Internet Protocol Address. In general, the dedicated IPs are required for websites that install Security Sockets Layer (SSL) certificates.

Shell Access refers to the capacity to use the Secure Socket Shell in the server with the username selected at the start of this process. You can enable SSH only on a per-user arrangement.

Microsoft employed FrontPage Extensions in the past but discontinued its use because of security and troubleshooting problems. These extensions refer to the software that permits users to communicate with web servers. FrontPage also offered additional functionality for websites and facilitated easy uploading of sites in Microsoft.

Common Gateway Internet or CGI Access makes possible serving of web pages using the CGI scripts. This protocol runs guestbooks that allow visitors to leave their comments, forums, and interactive scripts on multiple sites. cPanel provides bloggers and webmasters means in obtaining CGI access.

The cPanel Theme Manager has several themes cPanel users can view after logging in to their accounts. Default x3 remains as the current frame. Stick to the default version unless you plan to install a customised theme.

Localisation refers to text translation from a single language to several languages along with adding cultural variations, so products can become serviceable worldwide. WHM and cPanel maintain a Locale System that utilises the Comprehensive Pert Archive Network (CPAN) Locale. This repository contains more than 250,000 software modules as well as documentation for 39,000 distributions. These are written by some 12,000 contributors in the PERT (Programming Evaluation Review Technique) programming language.

Reseller & DNS Settings

The Reseller Settings Section takes care of transforming the cPanel account into a reseller. Real reseller settings are fixed in a different location in WHM. On the other hand, DNS Settings will apply if the server will host the Domain Name System for the cPanel account. Domain Keys Identified Name (DKIM) and Sender Policy Framework (SPF) refer to spam prevention measures requiring specific DNS entries. These are useful but will only apply if the user hosts emails for the account on both Domain Name System and Server.

  • The 3rd Setting configures nameservers intended for the domain. If the box is not checked, it will use default nameservers set for that domain. Otherwise, checking the box enables Web Host Manager to perform the DNS lookup and use nameservers configured at the registrar. The 4th Setting overwrites DNS zone files for the domain which could have been installed previously on the server.
  • DNS settings are crucial to proper configuration if the web server will handle the DNS for that domain. Check the box if you will host the DNS elsewhere so WHM can find the information. Leave the box unchecked if you will host the Domain Name System on your server to use sever defaults.

Details on Mail Routing Settings

The Mail Routing Settings permit users to select one item from the list. The first represents the default and suggested configuration. If you choose Automatically Detect Configuration, the mail server is configured making use of the current Domain Name System settings.

Avoid using this setting if you intend to host emails for domain on the same server. If you proceed to Point DNS for said domain to this server, the mail server is configured as though mail hosting will take place at the old server. Emails are rejected until the mail server has been configured correctly.

If you wish to use this account for the domain email,  check out the Local Mail Exchanger (Handles all emails sent from the server) to avoid possible problems once the configuration is detected automatically.

The Local Mail Exchanger handles all emails coming from the server and sent to this domain locally. Backup Mail Exchanger is designed for multiple servers. The cPanel account serves as backup for an account from another server. If the mail server crashes on the other server, this mail server receives and holds emails for delivery until the other server is fully restored.

The Remote Mail Exchanger directs the mail server to transmit mails for the domain that comes along going to the appropriate mail server. Check the box if the server will not host emails for this domain. Remote Mail Exchanger refers to the setting that notifies the server regarding handling of all incoming emails.

Pressing the Button

Once you have finished making the necessary configurations, you can now click the Create button or tab. It takes some time for the server (maximum of several minutes) to successfully produce your account mainly because of configuration procedures. WHM will send you a notification after the process is completed.

If Web Host Manager issues a notice the account was not created, there was probably a missed setting that requires fixing. Do not worry. This should turn out as a minor issue. Just press the button and add the setting. Get in touch with your provider, if you fail to create an account but you believe everything has been set correctly. The host’s technical team can answer any questions you may have about setting up the cPanel account.

Congratulations! You have just created your cPanel account from within Web Host Manager successfully.

About http://resellerhost.co.uk/

Reseller Host is one of the most useful guides in reseller hosting. It provides the right information for new users with basic as well as advanced topics. Browse through its website to get a glimpse of the different subjects.

Categories
Articles

How to Add Free SSL Certificates to Your Reseller Hosting Account

Ensuring your reseller hosting account security doesn’t need to be expensive. It is now possible to install free SSL certificates.

Background

Owners of reseller hosting accounts need Security Sockets Layer (SSL) certificates from a reliable Certificate Authority (CA). The free SSL certificate is added to accounts allocated to account packages including the Auto SSL in your feature list. Although the free version does not have the same trust level as the paid SSL, it marks the course the Internet must take in terms of security.

Free certificates are not covered by warranty for data breach and misuse. The cPanel-powered free SSL certificate contains a 90-day lifecycle. It will be renewed and reinstalled automatically one week before expiry. As reseller, you and your customers are not compelled to initiate any move for certification renewal.

To obtain this free certification, you need a Certificate Signing Request (CSR), WHOIS protocol record, and corporate validation records before making the order. Have the CA validate your company and domain. You receive and install the issued SSL.

Let’s Encrypt

It is possible to obtain the free and fast SSL as well as Hypertext Transfer Protocol (HTTPS) in cPanel using Let’s Encrypt open source CA. The Authority offers SSL certificates free of charge for a maximum number of domains.  There is a straightforward way of integrating the Certificate with cPanel for automated and one-click installation which only takes a few seconds to finish. For hosting companies that do not support Let’s Encrypt, you can ask them to request support for this Certificate Authority.

Let’s Encrypt and the Automatic Certificate Management Environment Protocol (ACME) install an HTTPS server. It automatically secures a browser-trusted certificate without human intervention. This task is achieved by operating a certificate management agent (CMA) on the server. The two-step process consists of the following:

  • The agent must confirm to the Certificate Authority the web server runs on a domain.
  • This agent can request, renew, or invalidate security certificates for that domain.

This CA is enabled for all the new and current web hosting as well as reseller hosting cPanel accounts.  To determine if Let’s Encrypt has been enabled for your account, click the SSL or TLS button located in the cPanel Security Section. You can click either of these options for the SSL certificates:

  • Generate
  • View
  • Upload
  • Delete

You can now see Let’s Encrypt in the Issuer column on the succeeding page unless other certificates (not this brand) have been installed previously. After this Certificate Authority is enabled for your hosting account, there are no subsequent tasks. The whole system of installing, generating, and renewing Security Sockets Layer certificates is completed without human intervention. If the CA is already activated, certificates are made for each domain and any domain that you include in the future.

How to Troubleshoot

To reiterate, this CA is facilitated by default. Yet, there are cases it is not possible to create the SSL certification for any account automatically.  The instances are the following:

  • Another type of SSL certificate was installed regardless of whether it is valid, expired or elapsed, or self-signed. The Let’s Encrypt installer will omit the domain. Hence, no certificate is generated.
  • URL Rewrite rules that obstruct access to PUBLIC_HTML or the well-known directory can prevent this CA from coming up with a certificate. In case you use Uniform Resource Locator rewrite rules, it is possible to add the given line to .htaccess so the well-known directory is accessible.

Validation of Domains

Let’s Encrypt pinpoints the server administrator using a public key cryptography. The interaction of the software with the CA results in another key pair which means the server has control over the domain(s). To begin the process, The CMA requests Let’s Encrypt to prove it controls example.com. The Certification Authority also provides a random number or set of numbers the agent must sign using the private key.

Let’s Encrypt completes validation after the agent accomplishes pertinent procedures. As the legitimate Certification Authority, it also makes sure all challenges are met and confirms the signature on the authentication protocol. Let’s Encrypt tries downloading the file from the server ensuring it contains the acceptable content.

Activation Steps

To activate Let’s Encrypt CA, log into your hosting control panel. You will receive the hosting account details after procurement of the package. If the login details failed to function or you forgot the information, reset by performing the following:

Request and Install Let’s Encrypt Certificate.

  • Log in to the Direct Admin.
  • Click the domain name.
  • Click SSL Certificates you will find beneath Advanced Features.

See to it your website is prepared to use SSL certificates. Proceed to the Direct Admin home screen. Click Domain Administration. Click Domain Name. Check the Secure SSL.

Choose a symbolic link from private to public HTML. It enables the same dates for http and https to continue using files from the Public_HTML folder. Move the files to Private_HTML folder if you do not want this option. You can facilitate an HTTPS connection for your site’s visitors after the certificate is installed.

Adding Process

Let’s Encrypt for cPanel Installation including Plugin

  • Log in to SSH client at the root level. Include Let’s Encrypt repository using the following command:

cd/etc/yum.repos.d/&& wget

https://letsencrypt-for-cpanel.com/static/letsencrypt.repo

  • Install cPanel plugin. Installation normally takes around 1 minute. A test will run automatically if the installation is successful.
  • At this point, log in to your cPanel account to install your initial certificate.

Certificate Installation

You can view Let’s Encrypt for cPanel button under Security after logging in to cPanel.

  • Click to access active domains list before installing the SSL certificate. You will see Issue a New Certificate Section at the bottom of the page. The active domains include variations (with and without the www prefix).
  • Check multiple boxes if you need to install two or more certificates at one time. Or, click Issue Single link next to the domain where you prefer to install the SSL certificate.
  • Click any Issue Multiple links on top or end of the list if you check more than one box.
  • Click checkboxes beside the domains you do not want included in case you chose several of these in the preceding page. Choose the domain you want primary users to visit.
  • Check the box marked Install mail SMTPS/PO3S/IMAPS SSL certificate if you prefer one domain to access your email.
  • Click Issue to install your SSL.

The process usually takes between 10 and 45 seconds depending on the number of selected certificates for issuance. A message will pop up notifying you of successful installation upon completion of procedures. Try again if there was an error. It normally works after the first time. You can view the domains with installed certificates found at the top of the web page upon returning to the main page. Click the Remove Links in deleting certificates one after another. Otherwise, reinstall the link to renew certificates before expiration date.

Free Plugin Concerns

There are risks in installing plugins because regular upkeep and security cannot be guaranteed. Make sure to check the developer of suggested plugins by examining the Let’s Encrypt cPanel plugin source or storage. To install the Plugin of cPanel, perform the following steps:

  • Log into your server root via SSH and run the prescribed command required in downloading the plugin package to your web server.
  • Navigate to the directory created for that plugin.
  • Install the plugin by entering the given command.

You may install your first SSL certificate after receiving the notification saying that you successfully installed Let’s Encrypt manager.

  • Proceed to Security and click the Let’s Encrypt link after logging into cPanel.
  • Click the New SSL Certificate tab you will find on the Management Page.
  • Pick one of your domains registered to your cPanel account. Click the Submit icon to begin the installation of your certificate.
  • Wait for around 10 seconds. You will be redirected to the main page through a message informing you of the successful installation. The domain registered on the page will appear as well. You can also see several details listed on that page after installation.
  • You will find a certificate for the domain installed automatically (main domain and www prefix) beside the domain on that list. It includes the certification’s expiry date together with the number of days left until the termination.

Know the Different Options

Understand all the possibilities and options. For example, you can trust certain plugins more than others. To be sure, practice the necessary caution prior to installing any cPanel plugin. You may encounter some issues. Do not hesitate to get in touch with your host’s technical support team which is usually available 24/7. There are many ways like live chat, email enquiries, support ticket, and forums to address problems that users generally encounter along the way.

Categories
Articles

How to Make Money as a Reseller Host

There are so many reseller hosts doing business in the market today, so if you want to jump into the industry, you must make sure you know how to make the best of the opportunity.

Beginnings

How do you earn as reseller host in the United Kingdom? It is not easy. Yet, this business is viable with lucrative potentials. Your success will depend upon the efficacy of your Pay-per-Click (PPC) marketing campaign, conversion rates, and margin you use to operate. It is possible to target a six-figure income. However, start with a modest initial goal that is practically achievable. Decide on a profit margin but expert resellers recommend between 15 and 20 percent allowance. Anything more than this will mean your hosting packages are too expensive.

There are several considerations prior to launching your reselling enterprise. Study the specifics of this business carefully along with long-term benefits. Whatever your background is and reasons for choosing this venture, an effective catalyst for such a profit-oriented undertaking is to know the fundamentals of reseller hosting.

Choices for Reseller Hosting

The potential reseller has different alternatives from the simple and affordable to the complex and costly.

  • Shared Hosting

The principal web host permits you to sell your clients an amount of bandwidth and disk space. You are not compelled to possess a comprehensive understanding of hosting’s technical aspects. The hosting provider maintains network infrastructure and hardware. It will also configure, secure, and update all software apps.

Your responsibility is to create hosting packages, implement pricing, and interact with customers. You normally access the customised servers and control panels to establish branding. Allocate enough budget for advertising to remain competitive in this industry.

  • Dedicated Server

This is the ideal choice for those who prefer exclusive use as well as access to the physical server. Another party owns and operates the equipment that also maintains the data facility where the server is stored. With dedicated servers, you do not have to worry regarding other users of servers affecting your business. The key is you must have more technical competence in setting up the dedicated server. Another option is to employ a managed dedicated server, so the data centre maintains and troubleshoots the hardware.

  • Virtual Private Server

The VPS fills in the disparity between shared web hosting and dedicated servers. Virtual Private Servers are like a powerful main server segregated into various virtual spaces. Nonetheless, certain limitations make VPS a less feasible choice for resellers. Even then, the Virtual Private Server has an Operating System (OS) that clients can access and install software compatible to that system. This type of hosting represents a segment of larger central server connection. The node is a powerful dedicated server separated into multiple virtual environments.

  • Colocation Server

Colocation is suitable if you are very familiar with server management, setting up the server machine, and requiring features of an IT organization. Colocation enables you to maintain the server at a certain hub and share the bandwidth. Just set up the equipment. Then, bring it to the provider’s facility and lease a server from that company.

The provider is responsible for providing the Internet connection, power, and bandwidth. Benefits of colocation include sophisticated security consisting of cameras, backup power generators, and fire protection mechanisms. The downside is the cost compared to basic hosting.

Challenges

One of the major challenges in this venture is how to generate orders consistently. The selling process is not that straightforward despite tools like PPC, Search Engine Optimisation (SEO), and Social Media Marketing (SMM). You must allocate plenty of time, efforts, perseverance, and determination to this effort. To begin with, you need to do the following:

  • Find a reliable hosting company in the UK.
  • Obtain a reseller package that will provide you the opportunity to generate revenues.
  • Review the terms and conditions of your contract in detail along with the confidentiality clause and other stipulations before purchasing any package.
  • Create a business website for marketing and promoting your services.
  • Hire an SEO specialist for the optimisation of your website. You should learn about the appropriate keywords, content creation and management, Internet advertising, and social media networking.

Web Hosting Platform

This refers to the technologies that function jointly allowing all the enterprise’s services to operate in this digital generation and environment. Consider the following:

  • Business E-mail Hosting ensures premium spam and virus protection, secured private e-mail, 99.99% guaranteed delivery rate, and 100% uptime.
  • Safe Business Web Hosting implies speedy web servers, friendly hosting panel to administer multiple websites, and assurance that your website is protected by the latest technologies against intrusions and hackers.
  • Enterprise Domain Names Services or DNS refers to potent, fast, and protected DNS dispersed globally utilising a consistent network technology. Built-in DNS security provides DDoS protection for domain resolution, fixed load-balancing, automatic failover, and DNS security. These are run with a user-friendly management portal that eliminates technical barriers of entry for small and medium businesses as well as small enterprise patrons.
  • Multi-layered Security Services safeguard global networks, data hubs, and client-hosted services against attacks. You must invest in contemporary security technologies which ensure breaches are prevented at the perimeter and never enter your networks.
  • Backup and Disaster Recovery mean that capable hosting providers operate 100 Terabytes of backups. These consist of all services and client data on a 24/7 monthly backups. The backups are rotated and scattered across two geographically-dispersed regions if a disaster takes place in one region.
  • 24/7/365 technical support and monitoring indicates that services cannot be made possible without experienced staff who will observe, troubleshoot and support clients.

Operating the Business

Conduct research regarding the business. Study the entire scope of this venture. Concentrate on the aspects of web hosting, domain services, and email management. Many designers and coding professionals believe reselling allow them to control and manage their clients’ online presence. Among the requirements are the following:

  • Reliable personal computer with stable Internet connection or laptop if you work from remote locations.
  • Dedicated business phone for making sales calls and receiving possible customer queries.
  • Business license, business permits, and tax requirements.
  • Bank account and credit/debit card.

Formulate a strategic but easy-to-follow business plan. Define all your targets and objectives, target markets, business prerequisites, costs, and spending budget.

Look for the Reseller Host

In selecting the ideal reseller hosting firm, look for a provider capable of providing you the following:

  • Absolute efficiency and flexibility
  • Capacity to brand your web hosting company
  • Value-added features that include billing software, domain hosting, email hosting, additional scripts and monitoring tools
  • Enough disk space and bandwidth
  • Excellent customer and technical support team
  • Reasonable prices
  • Money-back warranty

Mailbox Size

The mailbox size without any limits is a very useful feature because users are not required to clean up their emails to hold incoming messages. Resources that hosting providers consider as extras are disk space and bandwidth. This is generally adopted after users consume plan allocations.

Bandwidth means amount of information passing through the web connection. It comes from the hosted services to the Internet. Disk space is the amount of data stored in the hosting. Said resources are measured in terms of megabytes (MB), kilobytes (KB), gigabytes (GB), or terabytes (TB).

It is essential to put in extra fibre capacity with exceptional security to safeguard online properties of users from cyber-attacks, malicious hardware, and viruses. Web hosts conduct research and development initiatives continuously for improving the user experience of clients. Modern technology will help ensure effective business operations.

Follow the Advice of Experienced Resellers

Expert resellers will advise you to choose a hosting plan based on available financial resources as well as number of clients you can possibly generate within the next three years and beyond. Hiring the most capable web host can turn out as the most crucial step. Make sure the company has impressive credentials. Providers with data facilities can communicate more efficiently compared to companies without a network of computer systems.

Opt for a cost-effective pricing structure. This can be one of the most intricate aspects you need to determine. Remember that you compete with other web hosts who can offer drastically lower prices. Others may impose exorbitant fees. Review the different pricing structures to enable you to determine available resources. Know the price of servers, operational costs, and relevant financial factors. Websites that need Secure Sockets Layer (SSL) certificates for electronic-commerce purposes usually charge higher rates like companies requiring more bandwidth and space.

Final Words

You sell hosting. Therefore, online presence is important. You must make sure your business website stands out among competitors. Look for an enticing name and impressive web design. The website must perform well. Pages should load quickly. Navigation must be simple. Produce catchy and relevant content. It will be an advantage if your website allows credit card payments and automated billing online. In other words, you need not worry about monitoring and recording every payment that comes in. See to it your clients have straightforward access to a help desk. This kind of support allows them to communicate with the provider for any unexpected problems with their websites.

Categories
Articles

How to Accomplish Basic WHM Reseller Administration Tasks

As a reseller, it’s important to know how to perform administrative tasks on your reseller account using WHM.

Web Host Manager (WHM) refers to a program allowing access to the cPanel backend. Reseller accounts use the basic WHM while Virtual Private Servers and Dedicated Servers get the root WHM. This Web Host Manager maintains administrative control over the server and enables the host to manage accounts of clients.  The WHM also acts as reseller control panel. However, resellers’ rights are limited compared to VPS as well as root user rights.

Functions of the Web Host Manager

The WHM provides a set of tools that can easily perform the following tasks:

  • Manage and monitor websites including resetting of passwords
  • Creation, suspension, and deletion of cPanel accounts
  • Access in checking and changing the Domain Name System (DNS) zones
  • Permission in verification of customer support requests through cPanel
  • Permission in checking server information and status
  • Create default page when coming up with new account
  • Access to customised hosting and control panel with extensive branding
  • Change client domain and user names
  • Move between each cPanel on your account and access or modify anything that does not need Structured Query Language (SQL) access

WHM Reseller Panel

Reseller users become subordinates of server administrators. As mentioned earlier, reseller users are confined by the server administrator to features that have an effect on clients’ accounts but not the entire server. The reseller panel or WHM is where the resold accounts are managed. Resellers can also retrieve created accounts. Reseller privileges are fixed by the server admin. One server can have multiple resellers.

Meanwhile, the uppermost level is the root user. The server administrator maintains complete access to the server as well as absolute control over various WHM functions. It can adjust global server and customised settings for users with more restricted privileges. Root users can gain access to different levels of the WHM interface which include the reseller and end-user cPanel. Only one root user is allowed for every server.

Guide for Performing the Tasks

To begin with, you must become familiar with access levels provided by WHM and cPanel servers in managing reseller hosting accounts. There are three levels of access to the Control Panel:

  • WHM (Administrative or Root level)
  • cPanel (User-level access)
  • Reseller (Users can create cPanel accounts under their control)

This tutorial will explain how resellers can set up cPanel accounts; administer allocation of resources by designating packages; and, allocating cPanel features in that package. The features consist of cPanel tools, utilities, and plugins such as AWStats or DNS Zone Editor.

AWStats is an open-source reporting tool for web analytics used in data analysis. These are intended for Internet services likes FTP servers, email, web, and streaming media. This tool evaluates server log files that produce HTML reports. DNS Zone Editor facilitates creation, editing, and deletion of service locators, Certificate Authority Authorization, text, and other records. Packages refer to resources including bandwidth limits and disk space usage assigned to cPanel accounts.

Create New Feature List

You can create or build the list with Features Manager.

  • Log in to Reseller WHM as the user. There are three built-in features which are Default, Disabled, and Mail only.
  • Navigate to WHM>>Packages>>Feature Manager. Add new Features List.
  • Choose the list that will be assigned to packages. It is possible to set up multiple features for various packages.
  • The new list is seen in the drop-down menu.
  • Decide on features you want to add and save. You can edit using the Edit Features List option. Said list may be transferred to a new package. Otherwise, simply edit the current package.

Create New Package

You can build a new package and assign it to a cPanel account.

  • Proceed to WHM>>Packages>>Add a Package. Specify the package name.
  • Look at the list of resources for this specific package. You may perform edits depending on your needs.
  • Find the Features List option by scrolling down to the bottom of the page.
  • Click “Add” to add package after specifying the data.
  • Revise existing packages by proceeding to WHM>>Packages>>Edit Package.

Create cPanel Account

Create a new cPanel account under the “From Reseller WHM.”

As reseller user you will own the cPanel account after logging into the WHM.

  • Click WHM>>Account Functions>>Create New Account.
  • Indicate the following details under Domain Information to create new account.

Domain – Primary Domain name of account

Username – Exclusive account username

Password – Choose strong password and confirm

Email – Identify the account’s admin email address

Package allocation and cPanel settings

  • Choose your preferred package in the package section that will be designated to the cPanel account.
  • Check the Tick Box to allow Common Gateway Interface (CGI) access for cPanel account. You can choose the cPanel theme from the drop-down menu. Select the default locale (system resource available through the app in locale-sensitive objects) from the drop-down as well. The CGI protocol runs guest books, forums, and interactive scripts on websites.
  • For DNS settings, you can enable the Sender Policy Framework (SPF) Domain Keys Identified Mail (DKIM) records for email authentication. SPF prevents forgery of sender address in emails. DKIM allows senders to connect domain names with email messages. Creation of the cPanel account automatically builds DNS zone files. Checking the Tick Box adds the equivalent TXT record in the zone file. You may also use nameservers listed at the Domain Registrar as one of the settings. Check said option if the domain in the cPanel account uses external name servers.
  • For the Mail Route Settings, you have the choice of Mail Exchanger used by email accounts in the cPanel. 

There is an option to detect the configuration automatically specifically mail servers used by checking mail exchanger records (MX). This is a certified and confirmed resource record in the DNS specifying mail servers accepting email messages for the recipient’s domain.

Local Mail Exchanger is utilised if the mail server is used for email functions.

Backup Mail Exchanger makes mail servers as backup if several mail servers are used.

Remote Mail Exchanger is an option in case the remote mail server is used to send email messages.

  • Click on the Create Button after pointing out the preferred settings in creating a new cPanel account.

Modifying Existing cPanel Account

  • To see all the cPanel accounts, proceed to WHM>>Account Information>>List Accounts. This provides you with the list of all current cPanel accounts.
  • Click the ‘+’ Button found in the LHS of the account’s domain name you want to view modification options.
  • You are free to change the cPanel password (Disk Partition, Quota, and Plan) or allocated package from the pop-up window. Get more complete options by clicking on the Modify Account option.

Suggestion for Advanced Users

For advanced clients, the Web Host Manager is an ideal way of implementing server-wide configurations along with administration. The WHM has numerous tools and backs up sophisticated web apps for reseller hosting administrators in managing their dedicated servers. Administrators can have control over their servers as well as the core software through several clicks of the mouse. You can even install new modules and software programs to provide hosting administrators these two capabilities:

  • Running custom scripts
  • Setting up multiple accounts with different levels of access based on the requirements of customers

Combination with cPanel

The reseller hosting plan used with cPanel permits the server admin to build, suspend, or delete accounts without difficulty. It helps set up server access for every account. This access authorises account permission for retrieving valuable server information and changing server settings.

Accounts with specific features can be suspended if any user violates the terms and conditions of agreement. You may produce content and install display for new accounts. Emails are hosted on that server. The process of transferring accounts between multiple servers is not a difficult task. Server administrators are capable of migrating accounts of users to various cPanel accounts’ dedicated servers securely.

WHM can back up the reseller accounts for transfer and assist clients as well. Reseller management tasks may be assigned through the creation of multiple access levels to reseller consoles for various users. Reseller admin manages client setup as well as demo accounts.

WHMCS

The Web Host Manager Complete Solution is the fully-automated website and client billing solution providing a system for clients to order web hosting services, make payments, and submit the necessary tickets. It is provided free of charge together with most Premium Reseller accounts. WHMCS connects and coordinates with the hosting service.

Web hosting firms usually provide the Domain Application Programming Interface making it easier for clients to order their domains within the WHMCS setup. These hosts offer custom nameservers with glue records or nameserver glue that associates the Internet nameserver with an IP address. Clients can make use of this platform in setting up and pointing domain names to their hosting service.

Categories
Articles

Why You Should Host Your Clients Websites Under Reseller Hosting and How to Do It

Web design and marketing agencies and freelancers who don’t offer to host their clients’ websites under reseller hosting are missing out on a valuable opportunity.

If you are a freelancer, or own or work for a web design or marketing agency, you’ve probably been asked by clients if you can host their websites. This is not uncommon, especially if the client is not particularly tech-savvy and doesn’t want to deal with multiple aspects of having an online presence all at once. Perhaps you’ve shied away from doing so before, thinking that you don’t have the capability and required knowledge and experience to manage servers for your clients. This is where the beauty of reseller hosting comes in.

Reseller Hosting in a Nutshell

Reseller web hosting involves a parent web hosting company that rents hard disk space and bandwidth to another company or individual (in this case, you). In turn, you will then rent space and bandwidth to your own customers. It allows you to offer web hosting to your clients as a value-added service.
The great thing about reseller hosting is that you don’t have to purchase the hardware, maintain a datacentre, set up the physical servers, install Linux, etc., yourself. When you offer to host your clients’ websites under reseller hosting, all you will be responsible for are the following:
• Create and set up a hosting account with a parent web host
• Host your customers’ websites under your reseller hosting plan
• Maintain/update your customers’ web properties
• Act as mediator between the parent web host and your clients in case any hosting-related concerns arise

Benefits of Hosting Your Clients Websites

1. Additional and Recurring Income

One of the biggest benefits of providing web hosting services to your clients is that you will get additional and recurring income; and it’s no secret that recurring income is essential to any business. The reason why web professionals aim to work on a retainer basis is to ensure that they will receive steady income every month based on the number of hours that they put in. Web design and marketing agencies can earn recurring income when they host, maintain, and manage their clients’ websites.
Additionally, with reseller hosting, you are buying wholesale hosting services at a discounted rate and can offer them to your clients at a profit. You will start seeing an increase in profits once you start to resell hosting to several clients.

2. Value-Added Service

Most clients don’t have the know-how it takes to create websites and market them, much less the intricacies of web hosting. They don’t really want to think about anything that goes on behind the curtains; all they want is for their websites to do what they’re supposed to do. Having the ability to handle all aspects of their website makes you valuable to them.

3. Customer Satisfaction

You’ve likely encountered a situation in which the customer has come to you asking for help even after you are done creating and launching their website. In this scenario, you’ve already done all that you are bound by the contract to do. This puts you in an awkward position. On one hand, you’ve already done your part but if you don’t help, your client might think that you’re being unhelpful and become displeased with you. On the other hand, you end up helping them without payment.
Becoming a ‘one-stop-shop’ means you can ensure customer satisfaction as well as compensation for your efforts.

4. Control

Working on a client’s website that you don’t host can become tricky in some instances, such as when you need to upgrade versions of PHP and you’ll have to go through their web personnel, or if you must access their account and the IT guy has changed passwords, etc. When you host clients’ websites, you don’t have to go through anyone else in case there are changes that need to be made.

Of Domain Names and DNS

You might be asking, “Should I buy the domain name for my client as well?”
You can, but you might not want to. Here’s why: Since your client owns the business, they should also own the domain name. You wouldn’t want to be put in an awkward position in case you and your client hit a bump in the road and decide to part ways. Domain names are relatively easy to purchase so your client shouldn’t have any problems taking that task on. Also, domain transfers are notoriously troublesome.
However, you should definitely be able to control your customer’s DNS. Let’s say for example that you need to switch hosts or need an upgrade with your current host in the future. This means you will need to switch IP addresses, which in turn means that all A records must be updated. If you don’t have control of your client’s DNS, doing this can become a major issue.

Web Hosting for Agencies and Freelancers

Web professionals know that no matter how incredible a website looks and how well it functions, your customers won’t be happy if the website isn’t secure or if pages take too long to load. Therefore, it’s important to consider a variety of factors and criteria when choosing your parent web host and reseller plan:
• How much does it cost? – This is probably the first thing you’ll check when comparing web hosting companies and plans; however, it shouldn’t be the only factor on your list. Take an honest look at your budget and evaluate which plans you can afford. The most expensive web hosting plans aren’t always the best or the right fit. However, it’s also true that you get what you pay for. Find that healthy balance between cost and the hosting features that you absolutely need.
• Does the web host offer features that suit my needs? – Make sure that the prospective web host can support the operating systems, programs, applications, features, etc., that you plan to use. Helpful tools such as cPanel and the WHMCS account management and billing software are a big plus.
• Are they reliable? – Find out if the web host is reliable and has a sound track record. It is essential that the parent web host you choose is available 24/7 in case of technical issues. Find out what kind of support they have in place; live chat, 24/7 telephone support, knowledgebase, tutorials and user forums are the standard when it comes to reputable web hosts.

Questions to Ask Your Prospective Parent Web Hosts

• Do you offer an uptime guarantee? Can you prove it and show it in writing? How do you monitor uptime? Do you have a Service Level Agreement (SLA)?
• How do you handle downtime?
• Do you offer a money-back guarantee?
• Do your rates go up periodically? How often and by how much?
• Do you offer free website migration assistance?
• How do you handle site security? What kind of security features do you offer?
• Do you proactively monitor and apply security updates?
• Do you provide SSL?
• How easy is it to scale up or down if I need to?
• Do you provide technical support 24/7? How can customers contact you in case issues arise?
• What is your average response and resolution time?
• Do you perform regular backups? How do you handle restoration of backups Do I have to pay extra for this service?

These days, most businesses rely on their website as an essential part of a marketing plan. If you’re going to offer to host your clients’ websites, you need to choose the right web host and reseller hosting plan by determining whether their pricing and services suit your needs. It may take some time, but it is important that you do your research well. You will be able to make an educated decision on which provider to choose when you compare and understand the differences between reseller hosting plans offered by various companies, analyse your specific requirements, and ask vital questions.

Categories
Articles

How to Transfer From Heart Internet

Thinking of migrating your Heart Internet reseller hosting account to another provider? Only a few web hosting providers have the tools to facilitate a smooth and easy migration process from Heart Internet.

Heart Internet is a Nottingham, UK-based domain registrar and web hosting provider. Established in 2004, Heart Internet has grown to become one of the most well-known and trusted companies in the industry, offering various shared, reseller, VPS and dedicated server hosting packages.

Unfortunately, there have been a number of complaints from Heart Internet customers over the years who have encountered critical issues such as downtimes lasting 3 days or more. What further exacerbates the problem is that customers’ tickets aren’t being addressed helpfully and the company’s technical support is nearly impossible to get in touch with. This puts resellers in a very precarious situation with their clients. Think about it: business owners who rely on their websites to earn profit lose opportunity and income for every minute that their websites are offline. Unsurprisingly, the reseller host – in this case, you – will get the brunt of your clients’ frustration.

As a reseller, the parent company’s problems become your problems, and your reputation is tarnished along with theirs. For this reason, many Heart Internet customers are choosing to migrate to other web hosting providers.

Now, of course no web hosting company is perfect – you are bound to run into issues no matter which provider you choose sooner or later. The difference lies in the efficiency, skill and promptness with which a company handles and resolves these crises.

Potential Issue with Migrating from Heart Internet

Migrating from one web host to another is usually pretty straightforward. Most web hosting companies utilise cPanel control panel which makes switching hosting providers a smooth and easy process. What makes transferring to a new web host from Heart Internet a complicated procedure is the fact that Heart Internet uses a custom control panel known as eXtend for their shared and reseller hosting plans.

Steps for Switching from Heart Internet to Another Provider

Thankfully, a few web hosting providers such as Jolt.co.uk have migration tools to facilitate an easy, smooth and simple migration process so you can move your websites, databases and emails to their servers.

For this article, we’ve chosen Jolt’s transfer process as an example:

Step 1: Order your desired hosting package, whether that is shared, reseller, VPS or dedicated server hosting.

Step 2: Inform the technical support team of your plan to migrate from Heart Internet and let them know the convenient time to move your website/s.

Step 3: Provide the technical support team with your Heart Internet account login information.

Step 4: Jolt will move your website/s to your new hosting account on the same day (with a downtime of only less than an hour).

Step 5: Start using your new Jolt hosting account that comes with cPanel, WHM, WHMCS billing software, and other features.

If you are unsure whether the prospective hosting provider you are considering switching to can migrate websites, databases and emails from Heart Internet, the best thing to do is get in touch with them, explain what you need and inquire whether or not they can help you.

Keep in mind, however, that sales and support teams are usually completely separate teams within a single organisation, so make it a point to contact the technical support department directly if at all possible. You wouldn’t want to rely on a sales personnel’s assertion that they can migrate their sites for you from Heart Internet only to find out too late that the reality doesn’t stack up against their promise. If they can assure you that they can help you move your hosting account from Heart Internet, it’s also a good idea to determine how long the migration will take.

Categories
Articles

How to Transfer Your Reseller Hosting Account

The process of switching from one reseller hosting provider to another is a lengthy process, but it doesn’t have to be complicated and stressful

If, for whatever reason, you are unhappy with your current reseller hosting provider, then the best thing to do is to look for a new web hosting company and migrate your reseller hosting account. However, you need to carefully consider going this route and ensure that your customers’ websites are not adversely affected by the transfer process.

In order to make the process go smoothly and prevent issues from affecting your websites and those of your clients’, follow these steps for migrating to a new reseller hosting provider.

Migrating Your cPanel Reseller Hosting Account to A New Hosting Environment

Step 1: Choose a new parent web hosting company

Make sure that the new web hosting company you are transferring to provides free migration for your cPanel reseller hosting accounts. There are companies that will move all your accounts for free, while there are others that provide this complimentary service for only a few accounts, and charge extra for subsequent ones.

Before you decide on a new hosting provider, make sure that they are running the latest version of cPanel, as well as the same or newer versions of PHP, Apache and SQL. If you or your clients have websites that require any custom PHP/Perl extensions, make certain that the company you are switching to will install these for you prior to the migration.

Once you are satisfied that the new web hosting provider meets all your requirements and your account is compatible with their servers and the package you’ve selected, then feel free to sign up for a reseller hosting account.

Tip: DO NOT cancel your old hosting provider account until you have transferred all your accounts to your new reseller hosting environment. Your existing hosting account must have an active cPanel account so that you can migrate your websites from the old host to the new one.

Step 2: Generate full cPanel backups for each of your accounts

Login to the cPanel of each of your accounts in the old server and generate full backups for each of them through the Backup section of cPanel. Then, download the backups to your local computer. You can use the cPanel File Manager for smaller backups (under 1GB). However, the most recommended method is FTP or File Transfer Protocol.

If you have databases on your old account, you also need to backup your databases. You should contact your old web host for instructions on how to do this.

Tip: Remember to be patient; do not initiate multiple backups simultaneously because this may result in load issues on your old server. If this happens, system administrators may kill your backup processes. You can read the full documentation regarding the cPanel Backup Wizard here: https://documentation.cpanel.net/display/68Docs/Backup+Wizard.

Step 3: Create a new cPanel account in your new reseller hosting plan and upload the backups

Once you have the full backups of your resold accounts downloaded to your local machine, you can upload the backup files to your new reseller hosting account.

  • Navigate to cPanel > File Manager
  • Select Home Directory
  • Click the Upload button to upload the full cPanel backup

If you backed up databases from your old host, you should also restore these via SSH or cPanel’s phpMyAdmin.

Step 4: Submit ticket for transfer assistance

Once the backups have been uploaded to your new server, you must contact your new web hosting provider’s technical support team and request transfer assistance so that they can restore your backups for you.

Step 5: Test your site/s

After you receive confirmation from the technical support team that your files have been restored, log into the account and make sure that everything is accounted for. You can check if all the files have been restored by checking WHM > List Accounts. Also, check if the websites are working as they should on the new server.

Once you are sure you have all your files on both hosting accounts, the next thing you need to do is update your nameservers. Your new web host will provide you with the correct nameservers. You should also contact your new web host to determine the DNS settings you should use for your domains.

After you get the correct DNS from your new web hosting provider, contact the company from which you purchased your domain name and request that they make the change. In case you purchased your domain name from your host, this means you need to ask them to make the changes for you.

Tip: DO NOT cancel your old account right away. You should allow at least 48 hours for DNS propagation. In some cases, DNS propagation can take up to 72 hours; therefore, terminating your old account before the propagation is completed can result in downtime for your client’s websites. It’s also important to remember not to cancel your domain registration if you bought your domain name from your previous web host.

Categories
Articles

How to Buy Reseller Hosting

If you are thinking of establishing a reseller hosting business, it will be helpful to know how you can get started with reseller hosting – beginning with the features you should look for in a hosting provider, as well as the step-by-step process when purchasing a reseller plan.

Whether you are looking for a reseller hosting plan because you own and operate multiple websites or want to start offering web hosting packages to your clients, it is important to gather all the information you need so you can determine which web hosting company offers the most benefits and works best for you, allowing you to make the most of your reseller hosting business.

When choosing the best reseller hosting company, look for one that will provide you with these features:

  • Complete manageability and flexibility
  • Ability to brand your own web hosting company
  • Value-added features, such as billing software, domain hosting, email hosting, additional scripts and monitoring tools
  • Sufficient disk space and bandwidth
  • Stellar customer and technical support
  • Reasonable rates
  • Money-back guarantee

Choosing a Reseller Hosting Provider and Package

The success of your online venture depends on the reliability of your chosen parent web hosting company since the effectiveness of the service they provide will reflect on you. There are now a plethora of web hosting companies offering reseller hosting packages and the challenge lies in selecting the right one for your needs.

One way to do this is to read reviews of hosting providers. There are various review sites that offer comprehensive studies for dozens of web hosts, and they provide all the details you will need to make an informed decision.

Once you’ve chosen a provider, the next step is to pick out a package for your web hosting business. Reseller hosting plans usually come in tiers, with each tier offering more value for your money, such as storage space, bandwidth, account transfers, and number of accounts you can create, among others.

Generally, it’s recommended that you start with one of the most simple and economical packages offered. Doing so will allow you to boost your clientele without having to put up too much money right from the outset.

The Purchasing Process

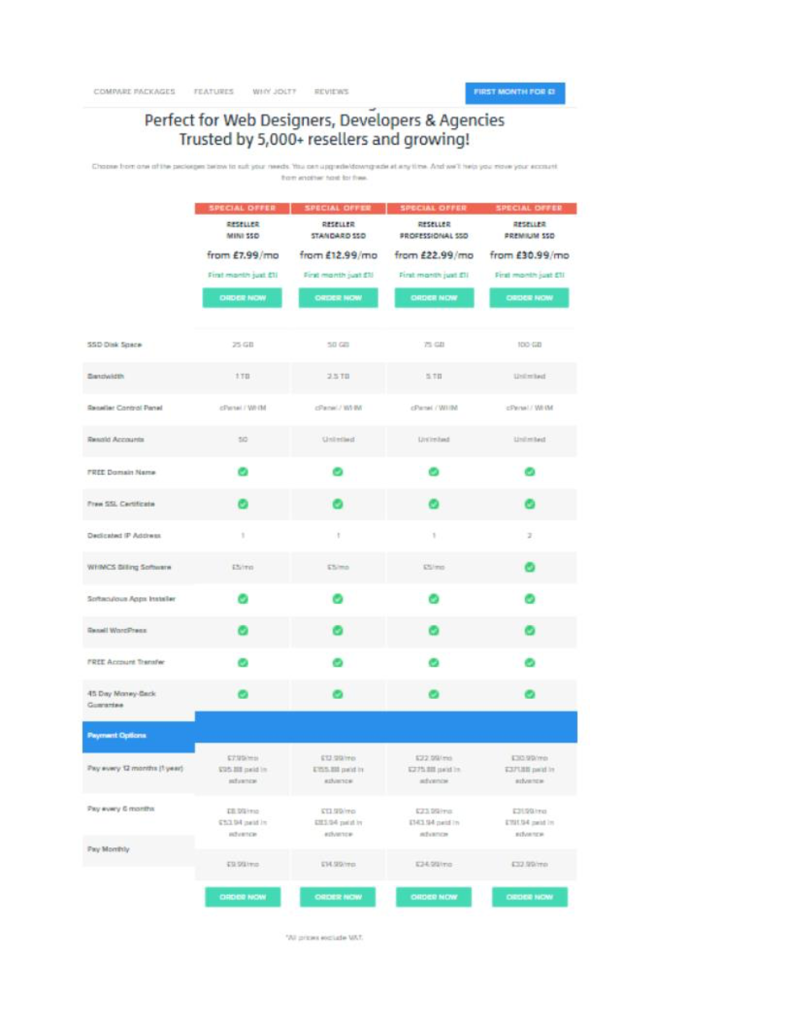
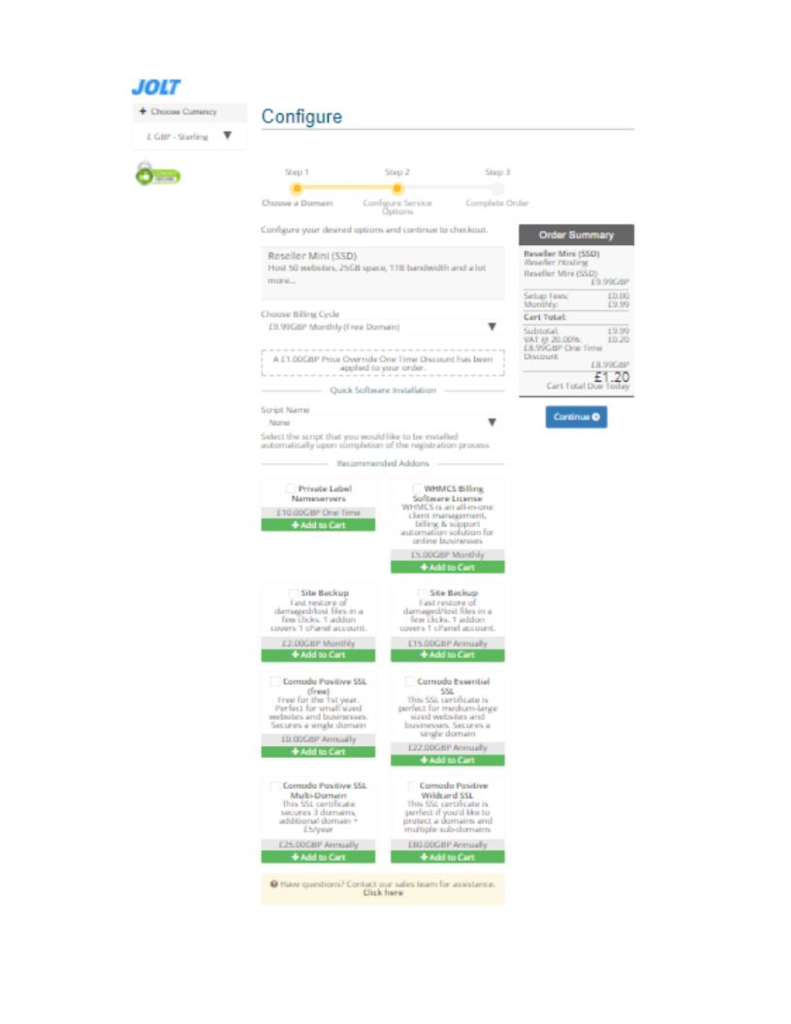
For this article, we’ve chosen Jolt’s Reseller Hosting Plans as an example for how to purchase a reseller hosting package.

Step 1: Select and purchase a domain name from the top domain registrars, such as NameCheap.com, GoDaddy, and Network Solutions, to name a few. Alternately, you can choose to purchase your domain name through your preferred reseller hosting provider.

Tip: Remember that the domain name you choose must be relevant to your business or purpose, easy to remember, and easy to type. Using keywords that describe your business and the services you offer is also a good idea. Also, make sure to use an appropriate domain name extension.

Step 2: Compare hosting providers and choose the one that offers the right plans that meet your requirements. For this example, we are using Jolt Reseller Hosting, one of the best reseller hosting providers in the industry.

Step 3: Analyse the different reseller hosting packages offered by your chosen provider. As mentioned above, these packages come in tiers, with each tier offering more features and benefits. Like most other web hosting providers, Jolt offers multiple reseller hosting packages: Reseller Mini SSD, Reseller Standard SSD, Reseller Professional SSD, and Reseller Premium SSD. These plans are designed to scale as your business grows, which means you can upgrade your reseller hosting package any time.

As you can see, aside from a 45-day money-back guarantee, Jolt offers their reseller packages for only £1 for the first month – this is currently one of the best reseller hosting deals as it will allow you to try out your reseller hosting business for one month without investing too much capital right from the beginning.

Carefully consider which plan will suit your needs best. Generally, if you are just starting out, the first and most basic tier will likely be sufficient to meet your requirements. However, if you are certain that you need more than the basic plan allows, such as more disk space and bandwidth and unlimited cPanel accounts, you can certainly choose from the other available plans.

Step 4: Select and purchase a reseller hosting plan. Click ‘Order Now’.

For this example, we’ve chosen the Reseller Mini SSD package.

Step 5: You will be taken to the shopping cart. You have three options; choose the one which is appropriate to your situation:

  • Option 1: Select ‘Register a new domain’ if you haven’t yet purchased and registered a domain.
  • Option 2: Select ‘Transfer a domain from another registrar’ if you’ve already purchased and registered a domain prior to purchasing your reseller hosting plan.
  • Option 3: Select ‘I will use my existing domain and update my nameservers’ if you wish to transfer your reseller hosting account to Jolt.

Step 6: You will be asked configure your desired options before proceeding to checkout.

If you choose the basic package, you will need to purchase additional features that you would need or want, such as the WHMCS Billing Software, SSL certificates, and Site Backups, among others. Click ‘Add to Cart’ for the features you wish to purchase. The cost for these will be reflected on the Order Summary where you will see how much you will be charged.

Step 7: Once you are done configuring your service options, click ‘Continue’ on the Order Summary to complete your order.

Step 8: Next, you will be taken to the “Review & Checkout” page. You can choose to remove any product or options if you want, or proceed to checkout by clicking on the green ‘Secure Checkout’ button.

Step 9: Fill up the “Secure Checkout” page. You will need to provide personal information, such as your name, email address, telephone number, as well as a billing address.

You will also need to fill up the “Client Area Login Password” section. The password you provide will be the password you will use to login to your Jolt reseller hosting account. Make sure to choose a strong, secure password to avoid account theft.

The “Secure Checkout” page also includes accepted payment methods. Jolt offers three payment options: Credit/Debit Card, PayPal, Direct Debit, or BitCoin.

Select the payment method you would like to use. Tick the ‘I have read and agree to the Terms of Service’ box after reading the TOS. Then, click the blue ‘Complete Order’ button.

Step 10: After successfully paying for your reseller account, you can expect a few email messages from Jolt.

  • The first email will be entitled ‘Jolt.co.uk Invoice Paid’. This serves as an official receipt for your purchase of the reseller hosting package.
  • The second email will be entitled ‘Welcome to Jolt.co.uk’. This email will confirm that your new account has been setup and provide the details you will need to be able to login to the client area, such as the email address and the password you provided upon sign up.
  • The third email will be entitled ‘Jolt.co.uk Reseller Account Details’. Make sure to read this email in full and print it. This message contains all the necessary details you will need in order to login to your cPanel and Web Host Manager, such as the username and password. You will also find the links to your cPanel and Web Host Manager in this email. It also contains other useful information such as how to create a new account in Web Host Manager. Equally important, this email will contain the nameservers to which your domain should be pointed. Other helpful links are included in this email such as the Jolt Wiki, blog, support, and server status pages.

Step 11: You can now login to your Jolt Dashboard. This is what it will look like:

Clicking on ‘Services’ will take you to the “My Products and Services” page where you can view your current products and services, place a new order or view available add-ons.

Clicking on ‘Domains’ will take you to the “My Domains” page where you can view your active or expired domains. You can also register or transfer a domain via this page.

Clicking on ‘Invoices’ will take you to the “My Invoices” page where you can view all your Jolt.co.uk invoices and the status of the invoices. At the top left side of the page, you will be able to quickly see if you have any unpaid invoices. You can also view quotes generated for you by Jolt.co.uk, configure mass payment for invoices, manage credit card, and deposit money in advance.

Important Note:

Note that the Jolt.co.uk dashboard is where you will be able to manage your Jolt Reseller Account, pay your monthly bill with Jolt, submit helpdesk tickets, edit your personal information, manage your domains, or order new services from Jolt.

On the other hand, the Web Host Manager dashboard is where you can create, modify or delete reseller accounts, add packages to offer to your clients, and configure the server linked to your Jolt Reseller Account. Meanwhile, the cPanel dashboard allows you to manage File Manager, FTP Accounts, backup wizard, email accounts, and databases, to name a few.